Fruit

Inspection Types

There are a multitude of different ways of inspecting fruit to establish its current condition. We have simplified this into two types and called them “speed checking” and “full quality inspection”.

The table below outlines these two types of inspections and indicates their features and processes. Depending on your situation, you may decide to use either option, or in some circumstances both.

Assessment Key Features Process
Speed Check
  • Provides product overview
  • Fast paced
  • No equipment required (visual & touch)
  • Keeps product moving
  • Low recording intensity
  • Subjective assessment
  • Visually inspect 3 or more packs from the top of the pallet to determine firmness range and level of defects.
  • Only the top ¼ to ½ of a loose pack is looked at.
  • Recommend next action: sample further, hold, condition, dispatch.
Full Quality Inspection
  • Provides detailed characterisation of a small sample
  • Requires equipment (visual + feel + instrumental measurements + cutting of fruit)
  • Valuable as permanent record
  • Required when a speed check has revealed high levels of variability or other quality concerns.
  • Sample at least two packs per inspected pallet.
  • Inspect whole packs should be inspected to give a more accurate picture
  • Minimum sample size per pallet >100 fruit\
  • Pick up individual fruit for inspection. If a fruit feels soft then a penetrometer can be used to determine its firmness.
  • Record findings against the grower / pallet number along with the sample size.


Sample Selection

All fruit can be variable in its quality and kiwifruit is no exception. There can be variation between grower lines, pallets, packs and pieces of fruit. It is critical to take a representative sample of your fruit when attempting to assess its condition.

Depending on the activity (e.g. receiving fruit, holding fruit in storage or ripening fruit) you will need to adjust your assessment protocol, always ensure you -

  • Assess fruit as soon as possible after delivery to ensure you identify any potential issues

  • Select sample pallets from different locations in your coolstore or container (e.g. front, middle, back).

  • Try to assess packs near the centre of the pallet (not the top two rows).

  • Identify the different grower lines on the pallet (using the pallet card) and target the majority grower. This is especially important when ripening fruit as all grower lines ripen at different rates.


Insert container plan graphic from ‘recommended sample selection’ page [To be provided by Zespri}

Pack selection

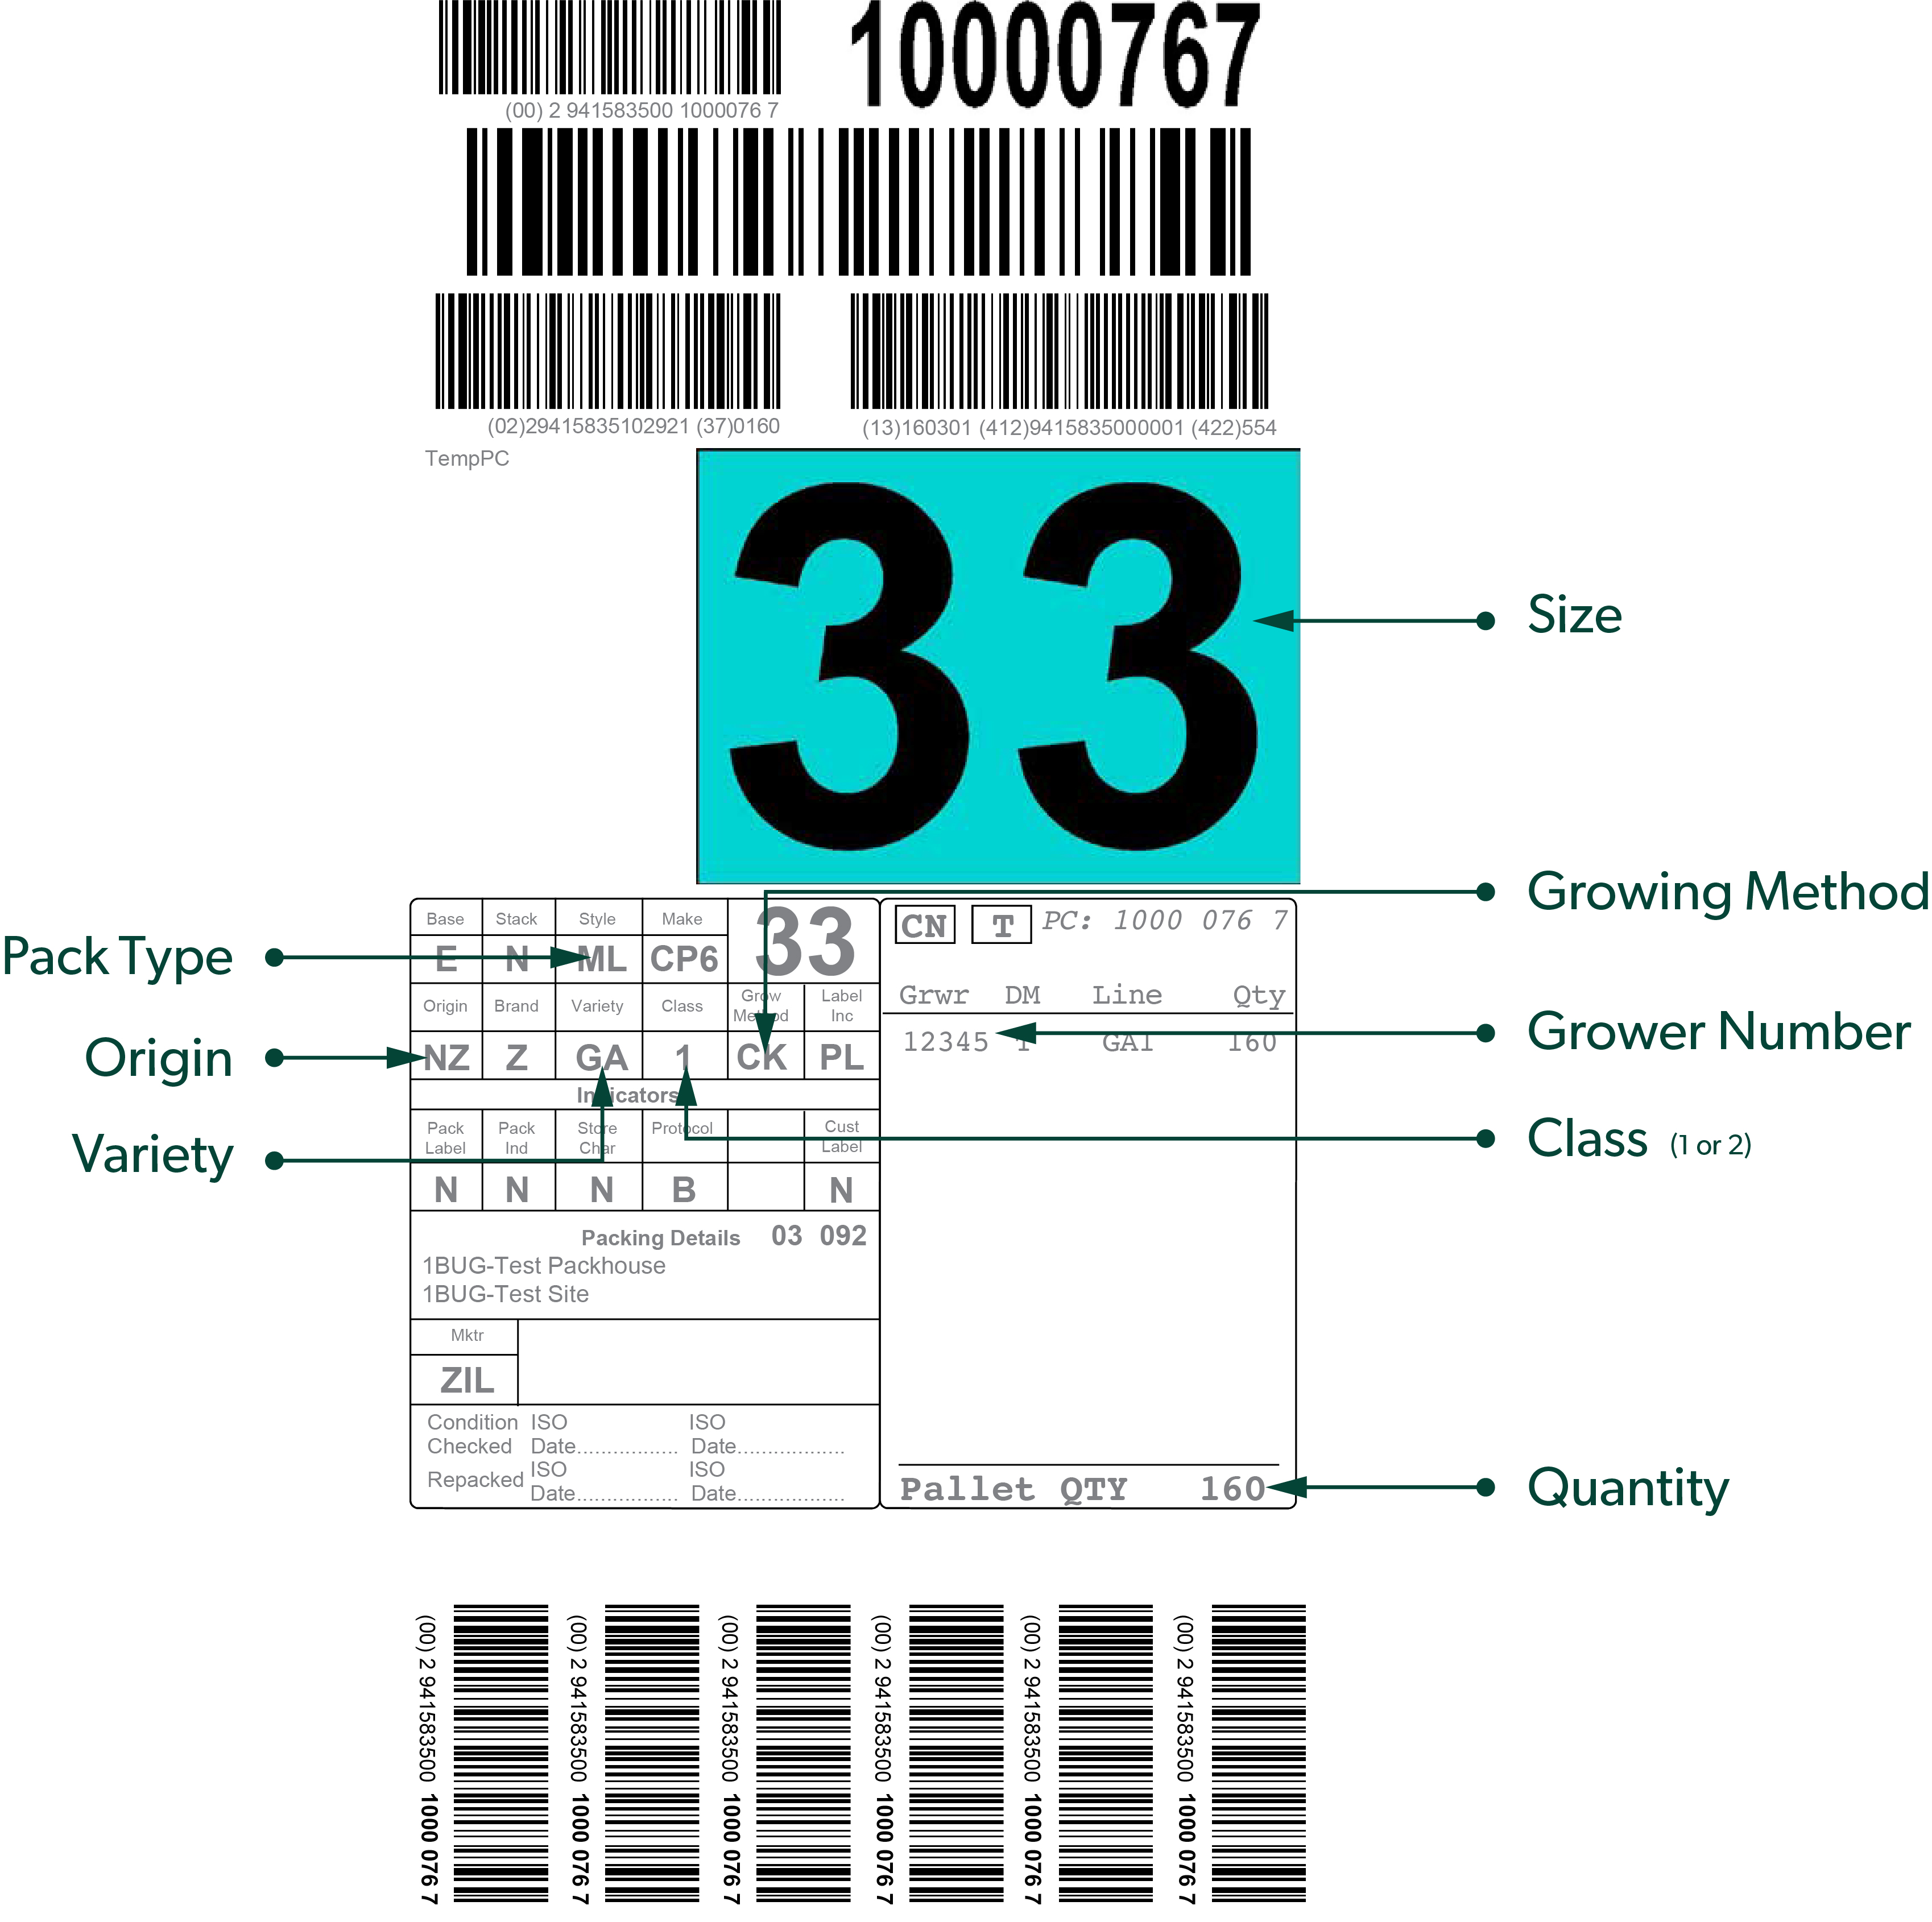
Identify the majority growers: when choosing which packs to sample, be mindful that some pallets contain a number of growers. Where possible, it makes sense to identify the majority grower on the pallet (this grower’s packs should account for the bulk of your sample.)  To identify the majority grower line, simply look at the pallet card details attached to the pallet (link to pallet card).

Select packs from different locations: take samples from throughout the pallet. It is best practice to include some packs from the centre of the pallet in your sample as the centre temperature can sometimes differ to pallets on the outside of the pallet. Avoid taking your entire sample from packs where you expect the firmest or softest fruit to be. Insteadake a representative sample from different parts of the pallet.

Insert pack graphic from ‘recommended sample selection’ page [To be provided by Zespri} 

Flesh Temperature

It is important that equipment is used correctly and maintained in good working order at all times so it can be used with confidence. Your fruit’s flesh temperature will provide a good indication of how your storage environment is  performing. You should take regular measurements of your fruit’s temperature as this will inform you as to whether there are any cooling issues with your storage – the sooner you can identify and address such issues, the better. Your fruit will begin to warm the moment you remove it from its refrigerated environment. This change in temperature can affect fruit firmness in two ways.

Measuring Fruit Temperature

The warmer your fruit, the faster they will ripen. You will need to measure both fruit temperature and the temperature at which fruit are stored. Measure fruit temperature on a representative sample (Link to taking sample section) using a temperature probe.

Calibrate your temperature probe

Calibrating your temperature probe is important for gaining accurate measurements.

  • Use ice from a pure water source

  • Crush the ice into small pieces and mix with a little pure water in a container to form an ice slurry.

  • Insert the temperature probe’s sensing needle into the ice slurry. Stir the slurry with the probe, keeping it moving through the middle of the ice slurry.

  • Read the temperature after 1-2 minutes after the reading has stabilised.

  • If necessary, either adjust probe itself or record the corrective factor on the assessment sheet and factor this into your records.

Fruit Firmness

Fruit firmness provides an indication of fruit maturity, and can be used to quantify checking results. Assess firmness by hand or taking a firmness reading with an electronic firmness tester or handheld penetrometer.

Hand Assessment

Assessing fruit by hand enables you to get a quick understanding of its current level of firmness. If required a firmness tester can be used to validate results.

The correct method is palming the fruit in your hand and gently applying pressure with the flats of your fingers. Do not prod with your fingers or squeeze with your thumb as this will mark the fruit and will create bruises (these bruises may not be visible immediately).

Firmness Assessment with a Penetrometer

Equipment Required

Slicer:  A sharp slicer to cleanly remove a 1mm thick slice from the surface.

Penetrometer: A calibrated penetrometer with a Maximum 5-kilogram force [kgf] range for accuracy with a 7.9 mm probe.

Electronic Scales (Optional): Used to calibrate the penetrometer.

Drill Stand (Optional): Mounting your penetrometer onto a drill stand will improve the repeat-ability of your measurements with the correct probe angle and speed.

If you do not have a suitable drill stand, hold the penetrometer firmly in your hand and rest your arm on a firm surface then use your elbow as a pivot. 


***Wave to do mock-up of Stu's pivot diagram.*** 

Calibrate your penetrometer

Calibrating your penetrometer is important for gaining accurate and reliable measurements. It is important to verify your pentrometer's accuracy daily. To check that the penetrometer is calibrated you can use an electronic scale.

  1. Reset the penetrometer to zero and then press the probe onto the scales.

  2. Look at the scales, not at the penetrometer. Once you have reached 1 kilogram then check the reading on your penetrometer

  3. If the reading on the scales is different to the penetrometer apply the appropriate corrective factor to all data you collect in the upcoming session.

  4. If the correction factor is greater than 0.25 of a kilogram the penetrometer is likely inaccurate and will need to be corrected by a specialist.

Cleaning

  • It is very important to ensure that penetrometers are kept clean, a splash plate will help maintain the cleanliness of your penetrometer.

  • The build up of debris and juice can stop the penetrometer from working correctly and provide inaccurate readings

Measuring Fruit Firmness

Sample Type

Verifying Softs - Avoiding causing further damage to the fruit, locate the soft patch and assess its firmness. Only one measurement is required to verify the soft status.

General Firmness Assessment - Reject fruit should not be assessed when determining your line average. To get the average reading of a piece of fruit take two firmness readings at right angles to each other.

Sample Selection 
Select a representative fruit sample you wish to characterise.  The larger the sample size, the more representative the results will be. If the sample size is small, then your best to palm fruit and select fruit that provide a similar firmness distribution to what is in the pack. 

Preparation

Temperature - Measure fruit firmness while it is close to storage temperature. Do not allow your fruit to warm up more than 5 degrees, as this will impact your firmness readings.

Slicing - Take a clean slice (approximately 1mm thick) from midway between the stem and calyx ends of the fruit. Rotate the fruit 90 degrees and take second slice. Unless assessing for softs in which case slice the soft area of the fruit.

 Taking Measurements

  1. Set the penetrometer needle to zero.

  2. Support the fruit on a firm surface & depress the plunger into the peeled fruit. Ensure you do not go insert the plunger further than the scribed line.

  3. Record the reading indicated by the needle on the circular dial (ensure the reading is taken from the kgf scale).

  4. Reset the needle to the start point by pushing the button on the side of the dial.

  5. For each fruit take two readings at right angles to each other (90 degrees to the original slice). Take a second measurement from the second site on the fruit, average the two results to calculate the firmness of the fruit.

  6. Repeat the process for the rest of the sample.

To determine if a kiwifruit should be classified as a soft, use the slicer to remove skin directly on top of the soft area, then follow steps 1–3  detailed above. [1 kgf = 2.2 lbf].

Fruit Sweetness

Fruit sweetness is one of the most common measures of fruit ripeness. As fruit ripen, their starch coverts into sugars and consequently the fruit's Brix level increases. The higher the Brix, the sweeter and more tasty the fruit. A refractometer will measure the soluble solids content of the fruit and provide you with a Brix reading.

Measure Fruit Sweetness

After calibrating the refractometer, take your fruit sample and:

  1. Cut them in half.

  2. Squeeze 2 – 3 drops of juice onto the refractometer prism, ensure the base of the prisim is completely covered in juice.

  3. Press the start button and the refractometer will display the level of Brix

  4. Immediately record the reading - a delay might affect the reading.

  5. Wipe the glass clean with a tissue.

  6. When you're changing grower lines or you have finished sampling use a tissue with distilled water to clean the refractometer.


Calibrate Your Refractometer

Calibrating your refractometer is an important step to ensure accurate readings. We recommend that the refractometer is calibrated each time before use. To calibrate the refractometer you will need distilled water and to follow these steps: 

  • Turn the refractometer on.

  • Fill the prism with distilled water and press start

  • If the display reads (0.0) the refractometer is correctly calibrated.

  • If any other result is displayed, use a tissue to clean the prism and repeat the process until you get a zero reading. In the case that you are unable to achieve a zero reading, and you are confident that your water is properly distilled, press the zero button to recalibrate.

Assessment Frequency

Assessing fruit at regular intervals or key stages of handling is essential to ensuring that no unexpected quality issues develop. The table below outlines key stages when assessments should be taken in order to monitor fruit quality; it also outlines what type of assessments should be completed.

Stage Assessment required Timeframe
Receiving fruit as it arrives by truck or container
  • Overall quality check; determine fruit firmness and temperature.
  • Within 24 hours
Ripening
  • Determine temperature
  • Assess fruit firmness and if further ripening required.
  • Every 12 hours
  • Every 6–12 hours
Storage (medium–long term)
  • Overall quality check; determine fruit firmness and temperature.
  • Every 2 weeks
Packing / Repacking
  • Overall quality check including fruit firmness. Ensure careful handling.
  • During process
Dispatching
  • Assess fruit before it is dispatched.
  • Confirm careful handling.
  • Within 12 hours of dispatch
At Retail
  • Assess fruit condition.
  • Ensure display meets Zespri brand guidelines.
  • 2–3 times per day